

|
|
|
Per la realizzazione del progetto sono necessari una scheda Arduino con Ethernet shield, un sensore digitale di temperature DS18B20, un pull up resistor da 4.7kOhm ed uno o due rele' elettromeccanici. Informazioni sulla scheda Arduino e la sua programmazione tramite il relativo ambiente di sviluppo integrato (IDE) sono ampiamente disponibili su Internet ed non rientrano nello scopo di questa pagina. I collegamenti tra i componenti possono essere realizzati come in figura, utilizzando un pin digitale per il sensore di temperatura ed un ulteriore pin per ciascuno dei rele' elettromeccanici 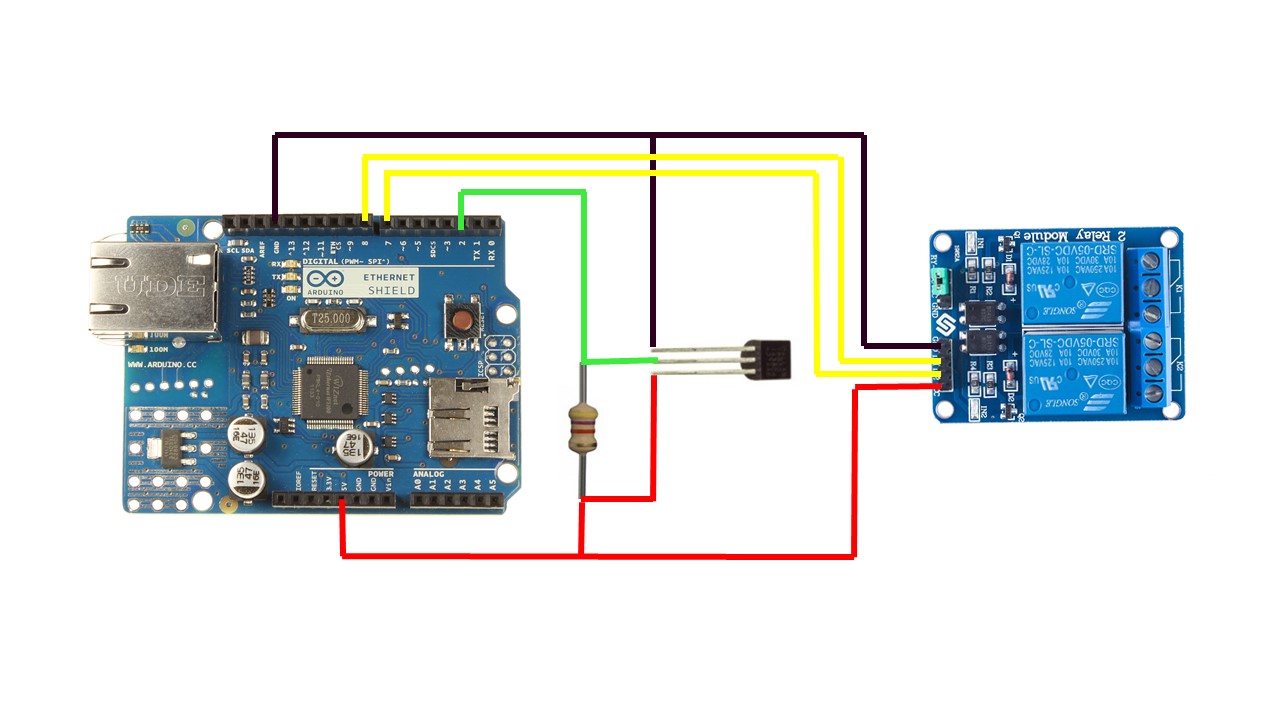
Il codice implementato permette il controllo automatico dell'accensione e spegnimento impianto di riscaldamento secondo le seguenti modalita': - Sempre acceso - Sempre spento - Mantenimento continuo di una temperatura fissa - Mantenimento di una temperatura variabile in base ad un calendario giornaliero e settimanale - Mantenimento continuo di una temperatura fissa fino ad una certa data e ora e successivo passaggio al calendario - Mantenimento di una temperatura variabile secondo uno specifico giorno della settimana fino ad una certa data e ora e successivo passaggio al calendario E' possibile impostare fino a 6 temperature diverse nell'arco di ciascuna giornata su fasce orarie a discrezione. Tutti i giorni della settimana possono essere gestiti in modo indipendente. E' inoltre possibile accendere o spegnere un boiler per la produzione di acqua calda secondo le seguenti modalita': - Sempre acceso - Sempre spento - Accensione e spegnimento in base ad un calendario giornaliero e settimanale Si possono avere due fasce orarie indipendenti per ciascuna giornata. Data ed ora del sistema sono costantemente aggiornate via Internet tramite un collegamento ad un server NTP. Le impostazioni del cronotermostato sono salvate ed aggiornate su un file di testo che deve essere caricato ed accessibile su un webserver in rete. Un esempio di file di impostazioni e' riportato qui di seguito: The project requires an Arduino board with Ethernet shield, a digital temperature sensor DS18B20, a 4.7kOhm pull up resistor and one or two electromechanical relays. Information on the Arduino hardware and its programming IDE (Integrated Development Environment) is widely available on Internet and it is out of the scope of this page. Connections among the components can be realized as per the picture below, using a digital pin for the temperature sensor and an additional pin for each of the electromechanical relays.
Implemented code allows the automatic switching off and on of the heating system according to following modes: - Always on - Always off - Keep fixed temperature - Keep target temperature according to a daily and weekly calendar - Keep fixed temperature until specified date and time and subsequent switch to calendar - Keep target temperature according to a prescribed week day until specified date and time and subsequent switch to calendar You can set up to 6 target temperatures over arbitrary time slots along the day. All days of the week can be managed independently from each other. It's also possible to turn on and off an hot water boiler according to following modes: - Always on - Always off - turn off and on according to a daily and weekly calendar Two independent time slots per day can be managed. System time and date are continuously updated through the Internet thanks to a connection to an NTP server. The chronothermostat settings are saved and updated on a text file that must be loaded on a webserver on the network. An example of the settings file is shown here below: myheatingSETTINGS.txt: In caso di perdita di connessione di rete il cronotermostato continua a funzionare regolarmente anche se non e' possibile cambiarne le impostazioni. Per un corretto funzionamento del cronotermostato e' invece indispensabile avere una connessione di rete all'avvio per la prima lettura di tutte le impostazioni. Il codice per Arduino realizza un semplicissimo server web. Collegandosi direttamente all'Arduino tramite il suo indirizzo IP con eventuale porta TCP(http://arduino_address[:port]) si ottiene in risposta un semplice file di testo con riportati i dati sullo stato e le impostazioni correnti. Inserendo nella URL il comando per ricaricare il file delle impostazioni (http://arduino_address[:port]/?SETTINGS=RELOAD) l'Arduino si collega al webserver di rete dove e' salvato il file delle impostazioni e ne carica il contenuto. Cambi di stato o di impostazioni del cronotermostato devono essere effettuati modificando direttamente il file di testo delle impostazioni presente sul webserver di rete prima di collegarsi all'Arduino con il comando di ricaricarlo. Questa modalita' di utilizzo e' schematizzata nella figura sotto. 
Per rendere l'utilizzo del cronotermostato molto piu' immediato e facile, ho anche realizzato una applicazione web. Una volta caricata sul webserver di rete permette di visualizzare lo stato del sistema e cambiare tutte le impostazioni mediante una semplice interfaccia grafica. Le modifiche al file delle impostazioni ed i comandi alla scheda Arduino sono gestiti in maniera del tutto trasparente per l'utente. Per il corretto funzionamento e' necessario che il webserver di rete possa far girare applicazioni ASP.NET. Questa modalita' di utilizzo e' schematizzata nella figura sotto. 
Il codice per la scheda Arduino e' riportato qui di seguito. I parametri relativi alla rete locale devono naturalmente essere modificati in base alla LAN a cui l'Arduino sara' connesso. Prima di procedere con la compilazione tramite al Arduino IDE, e' necessario caricare le librerie OneWire, DallasTemperature e Time mediante il Library Manager. In case network connection is lost, the chronothermostat goes on working regularly even if changes to settings are not possible. On the other side, the network connection is mandatory during the chronothermostat boot in order to allow the first loading of settings. The code for Arduino realizes a very simple web server. When directly connecting to the Arduino board with his IP address and an optional TCP port (http://arduino_address[:port]) you get an answer with a simple text summarizing data on status and current settings. When typing in the URL the command to reload the settings file (http://arduino_address[:porta]/?SETTINGS=RELOAD), the Arduino board creates a connection to the webserver on the network and downloads it. Status or settings changes for the chronothermostat must be implemented by directly modifying the text of the settings file on the webserver before connecting to the Arduino board and giving the reload command. This mode of operation is shown in the picture below.
In order to have a simpler user interface to the chronothermostat, I also realized a web application. Once loaded on the webserver on the network, it allows to visualize the system status and to change all settings with a graphical interface. All changes to the settings file and commands sent to the Arduino board are managed in a fully automatic way not visible to the user. The webserver on the network must be enabled to run ASP.NET applications. This mode of operation is shown in the picture below.
The source code for the Arduino board is shown here below. Local network settings should of course be changed according to the LAN the Arduino will be connected to. Before compiling with Arduino IDE, you've to upload OneWire, DallasTemperature and Time libraries with the Library Manager. Arduino_Riscaldamento_e_Boiler.ino: L'area di testo qui sotto visualizza il codice della pagina ASP.NET da installare sul webserver di rete nella stessa directory che contiene il file di testo delle impostazioni. Oltre alla versione in Italiano, e' disponibile anche un file con tutti i menu in Inglese. Tutte le variabili di testo visualizzate nell'interfaccia utente sono raccolte in una stessa zona del codice per facilitare una eventuale traduzione in una lingua diversa. Il file deve essere opportunamente modificato assegnando alla variabile "Indirizzo" l'URL o l'indirizzo IP della scheda Arduino. The text area below is showing the code of the ASP.NET page to be installed on the webserver in the same directory where the settings text file is. In addition to the English version, a file with all menus in Italian is also available. All text variables used in the graphic interface are collected in the same zone of the code to simplify their translation to a different language. The file must be modified by setting the variable "Indirizzo" to the Arduino IP address or URL. myheatingita.aspx: Tutti i file necessari per realizzare il sistema possono essere scaricati a questo link. Uno speciale ringraziamento a mio figlio Giulio che mi ha supportato nella realizzazione della pagina web ASP.NET. All files needed to realize this system can be downloaded at this link. Special thanks to my son Giulio who supported me in programming the ASP.NET web application. |
|
|


